Your business is only as good as your website!
Let me ask you something, and be honest…when was the last time you headed to your local shops to find the best wireless headphones? Or the most trendy new shoes? Or the most reliable travel mug?
There’s a reason why websites are utilised by every successful brand worldwide, from huge international brands like Nike or Apple to small independent local businesses. They provide credibility and trustworthiness, a way to sell products nationally or internationally, and a way to demonstrate expertise and authority by providing a wealth of information. BUT most importantly, they allow millions of people to find and buy your products right from the place they’re looking for answers…Google.
According to research by Statista, as of 2021 there are more than 2.14 billion people who have taken their retail therapy digital, and that’s only set to increase with e-commerce sales predicted to reach an incredible £48 trillion by 2028 (Optinmonster.com).
In today’s article, we’re going to help you make sure your website gets a slice of the action, because unfortunately just being in the game won’t cut it. If you want your website to succeed, you need to structure it for success.
So how is technical SEO going to help your website?
Let’s imagine a new customer’s journey to your website, and through your website;
- Your customer carries out a search in Google.
- They look through the search results provided to find the best option.
- From the list of results they select your website.
- They navigate to a product category that suits their product requirements.
- They scroll through a couple of pages of products to find the item they like.
- They click on the product to go to the product page.
- They expand the product description to read more about the product.
- Happy with the product details, they click ‘add to basket’.
- Your customer proceeds to the basket to check their products are right.
- They finally proceed to the checkout to fill in their delivery and card details to complete the order.
Technical SEO is what ensures that your customer gets past the second step. Technical SEO gives your website the chance to be seen by millions of searchers, to stand out above your competitors, and to provide your visitors with the best experience all the way from entering your website, to making a purchase. On top of this, it allows you to gather incredible insights as to how your visitors interact with your website. Through following good technical practices, you can find out where customers enter your site, what pages they visit, what products are being viewed most or least often, or how many people complete or drop out of your checkout sequence. In short, technical SEO can be the difference between your website feeling like an expensive mistake or feeling like the best investment your business ever made.
So if you’re ready to take your website from just surviving, to dominating in the world of e-commerce let’s get into our top 10 technical SEO tasks.
The Top 10 Technical SEO tasks every successful website should complete.
Continue reading to see our full checklist of essential technical SEO tasks.
Step 1 – Make sure your sitemap is correct
Step 2 – Adding your sitemap to Google Search Console
Step 3 – Ensure you have a robots.txt file that is set up correctly
Step 4 – Ensure canonical tags are implemented correctly to deal with duplicate pages
Step 5 – Make sure internal linking is properly implemented for a better user experience
Step 6 – Make sure you don’t have orphaned pages that can’t be found through the on-site navigation
Step 7 – Make sure any necessary page redirects are handled correctly
Step 8 – Make sure your website tracking is set up with Google Analytics 4
Step 9 – Make sure your website is utilising structured data to stand out in search results and increase CTR
Step 10 – Page speed
BONUS Step 11 – Maximise your website design and architecture
- Making sure your sitemap is correct – A sitemap is the first step to giving your website the best chance of appearing in Google. For those unsure of what a sitemap is, it is quite simply an XML list of the important pages on your website that you want Google to include in their index (as seen below).
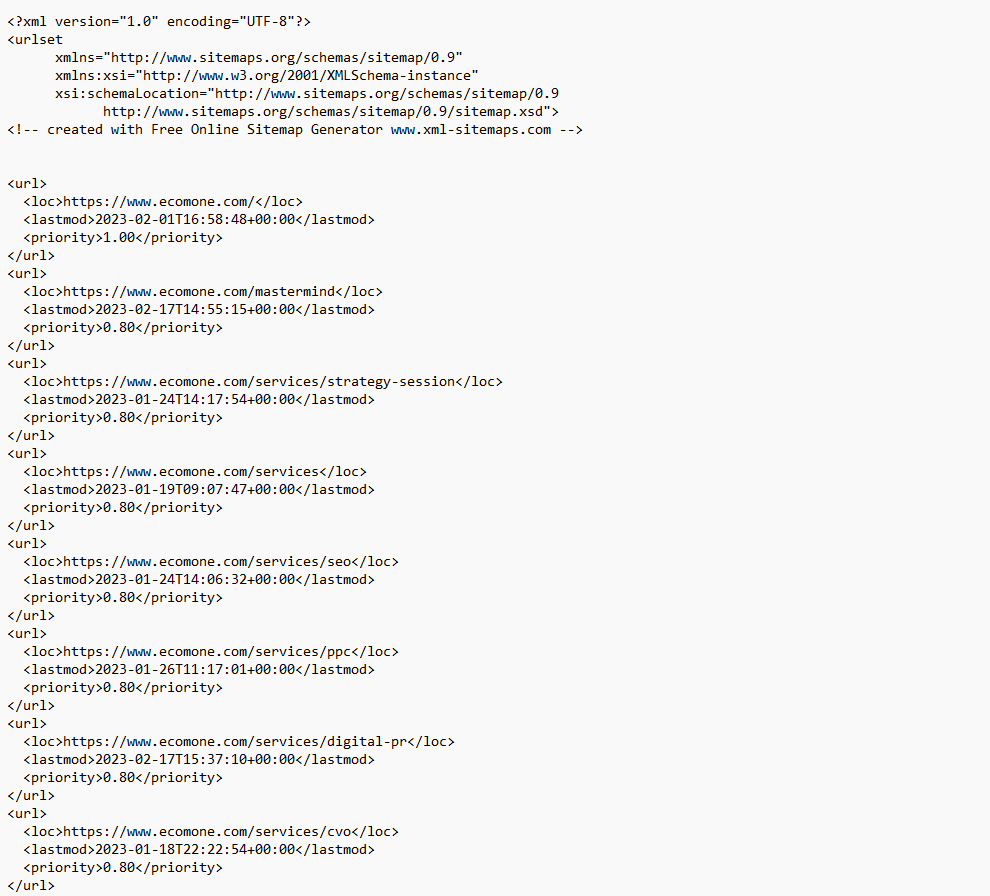
If you do not currently have a sitemap, the good news is, these are generally not too difficult to create. For smaller websites, sitemaps can even be manually created using a text editor such as notepad, however for larger websites it is recommended to use a tool such as Screaming Frog or xml-sitemaps.com to generate your sitemap for you.
Once your sitemap has been created and you’ve uploaded it to your Google Search Console account (see step 2), Google can then directly access the url’s in your sitemap providing a direct path to all of your website’s valuable pages. The quicker Google can find your website and index your pages, the quicker people can start discovering your website and purchasing your products.
Remember, your sitemap should only contain your website’s most important pages, this could be your homepage, product pages, main category pages, blog pages, or important visitor information pages such as shipping information and contact information. However, do not treat this as a list of every page on your website, by adding unimportant pages you run the risk of running into crawl budget issues, meaning your most important pages may miss out on being crawled and indexed.
Once your sitemap has been created, this also needs to be added to the root of your website and your robots.txt file, this will ensure your sitemap has the best chance of being discovered and read.
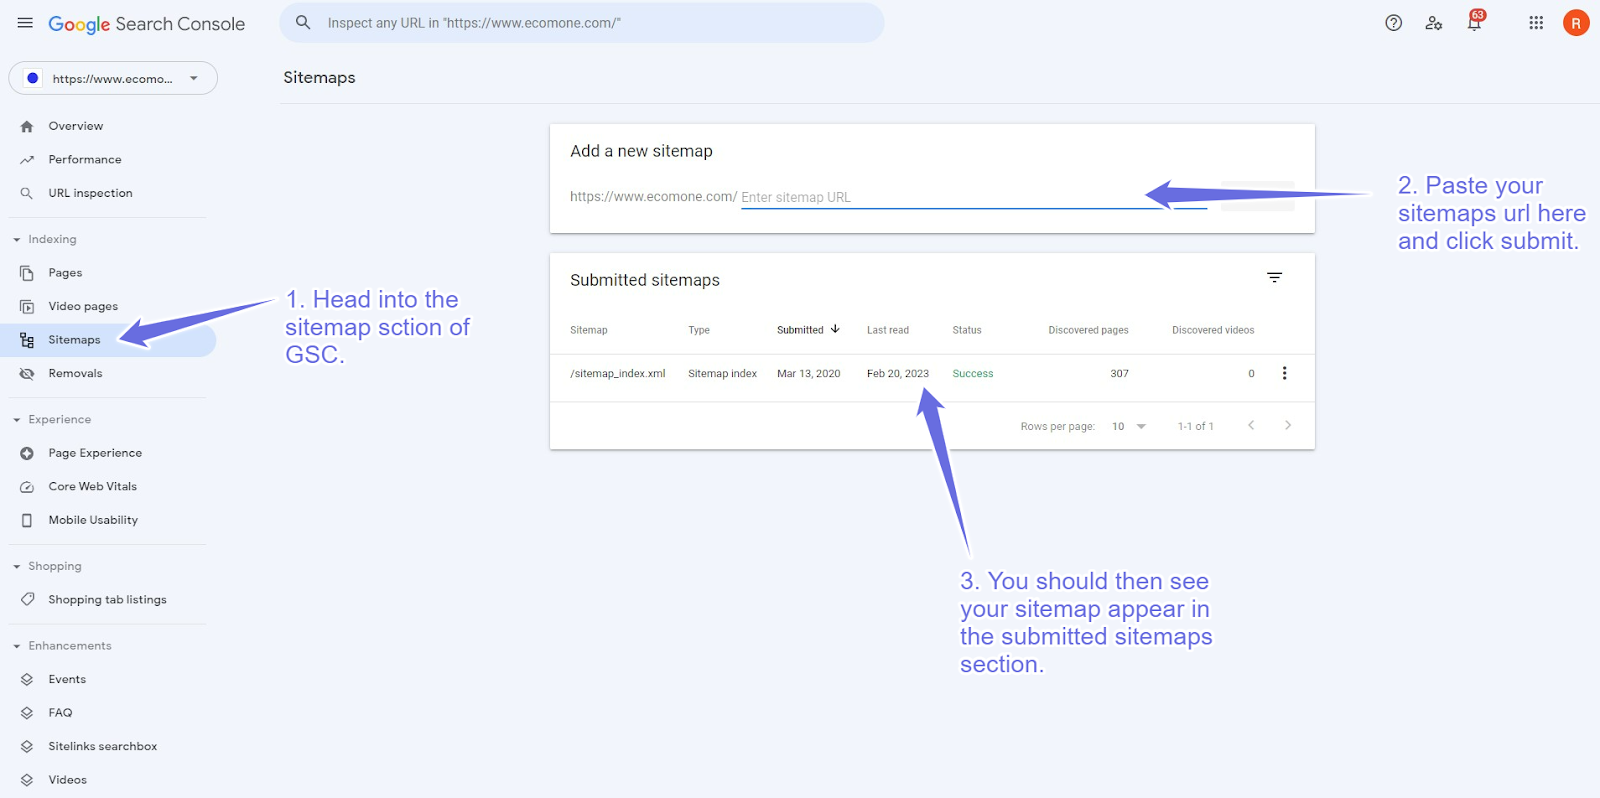
- Adding your sitemap to Google Search Console – Once your sitemap has been created, the next step is to make sure this is easily accessible for Google crawlers. The easiest way to do this is by adding your sitemap to your website’s Google Search Console account.
Again, this is relatively straightforward, if you already have a Google Search Console account, then you’re 85% of the way there. Once you’re in your account, simply navigate down to the sitemap section on the left hand side then enter your sitemap URL in the ‘add sitemap’ section.
Although this doesn’t mean Google will crawl and index your pages immediately, it does give your website a much greater chance of being discovered a lot quicker. So don’t worry if it takes a couple of days for your website to start appearing in the search results (remember, the internet is a big place, but Google crawlers will find your website a lot faster once you’ve submitted your sitemap).
- Ensure you have a robots.txt file that is set up correctly – So if your sitemap is a way to tell Google exactly what pages you DO want crawling and indexing, think of your robots.txt file as a way to tell Google what pages you DON’T want crawling or indexing.
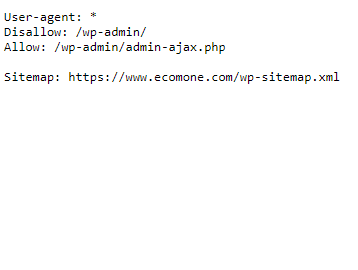
(An example of what your Robots.txt file might look like. BONUS TIP – Make sure you add your sitemap url to your Robots.txt file to boost discoverability for Google Crawl Bots)
Although this isn’t technically the case (as you can provide Google with directives on what pages to crawl and index in your robots.txt file) it makes it a lot easier to understand why both a sitemap and robots.txt file are needed.
For example, you might have a website that has lots of image pages, or where you have gated content for members. For obvious reasons, you probably wouldn’t want Google to index these pages, that’s where our robots.txt file comes in. This allows you to ‘noindex’ hundreds, even thousands of pages using a disallow rule, as opposed to ‘noindexing’ every single page individually.
However, when creating your Robots.txt file it’s crucial to make sure it’s done correctly as even a single mistake could result in your entire website being ‘noindexed’. As a result your website will not be able to be crawled and indexed by Google, this means your website will be completely undiscoverable in search engines, so if in doubt, it is recommended to get help with this step.
For a full breakdown on how to create a robots.txt file, you can view Google’s robots.txt guide.
- Ensure canonical tags are implemented correctly to deal with duplicate pages – Although there is much conflicting advice around the correct use of canonical tags in certain situations, something that is generally considered good practice, is that all pages should have a canonical tag, as these can be very important for SEO and Google ranking.

(An example of a canonical tag found in the ‘view page source’ page)
So before we go any further, what exactly is a canonical tag? In short, if your website has duplicate pages, a canonical tag is a way of letting Google know which version of the page is the master version that Google should index and show in search results.
For example
Imagine categorising products on an ecommerce store website. Now it’s probably fair to say that there will be products that could fit into multiple different categories. So let’s imagine you have a golf equipment website that sells men’s Callaway Mavrik drivers. There are multiple categories this product could go in (depending on what categories you have created) so it could go in the Callaway brand category page, it could go in the drivers category, or it could go in the men’s golf clubs category. The issue is, this could then create multiple url’s going to the same product, these url’s could be;
- https://www.joesgolfstore.com/callaway/mens-callaway-mavrik-driver
- https://www.joesgolfstore.com/drivers/mens-callaway-mavrik-driver
- https://www.joesgolfstore.com/mens-golf-clubs/mens-callaway-mavrik-driver
Or alternatively, we could choose to have a url that doesn’t include the category name;
- https://www.joesgolfstore.com/mens-callaway-mavrik-driver
The problem is, all of these pages are 100% identical with the exact same product, product title, product description ect, meaning that Google won’t know which version to index. Plus Google likes unique content, so if Google thinks your website is deliberately creating duplicate content to increase your chance of ranking for a keyword this can damage your website’s ability to appear in search results.
This is where canonical tags come in, this is your way of letting Google know which version is the master version that should be indexed, as well as letting Google know that you realise you have duplicate content, but you only want Google to rank one of them.
As far as which page you choose to be the master version, there is no right or wrong answer here, however, a common practice is to canonicalise to the version with just the product name (https://www.joesgolfstore.com/mens-callaway-mavrik-driver). All other versions of that page should then be given a canonical tag that points to the master version, this will also help consolidate page rank and authority from all the duplicate pages to the master version to increase its Google ranking ability.
If you’re not sure how to check if a page has a canonical tag and where it points to? Simply follow the steps below to find out;
- Go to the page you want to check
- Right click and scroll down to the ‘view page source’ option
- Pull up the internal search bar (this could be ctr + f or command + f)
- Search for canonical to see if the page has been given a canonical tag (see example below)
- If the canonical tag is not present, or the url in the canonical tag is wrong, this will need to be fixed in the back end of your website.
5. Internal linking is properly implemented for better user experience – Have you ever found yourself reading a blog article which focuses on promoting a product? It could be shoes, golf clubs, fitness supplements or any other product that’s sold on the store’s website. You’ve spent 15 minutes studying the article, reading about the benefits of the product, about the great reviews it has, and about its epic stats. Now you’re ready to make a purchase, you search for a link to head to the product page, only to find that there isn’t one.
Now although this might not be the worst technical crime, it is a problem, why? Because it breaks the visitor’s journey through your website and creates an inconvenience that may just be the difference between that person buying from you or going to Google to search for that product and buying it from someone else.
This is just one example of why optimised internal linking is essential for maximising user experience as well as visitor conversions. Internal linking is vital for making sure visitors do not run into dead ends on your website, or find themselves on a page not knowing where to go next, especially if we want to maximise conversion funnel success. One of your website’s key aims should be to keep customers moving through your sales funnel by constantly letting them know where to go next.
So with this in mind, let’s have a look at a great example of internal linking being used to move visitors from the product research stage of their journey to the purchase stage. The example used is from the end of a blog post providing guidance on cooking and nutrition for campers and outdoor adventurers.
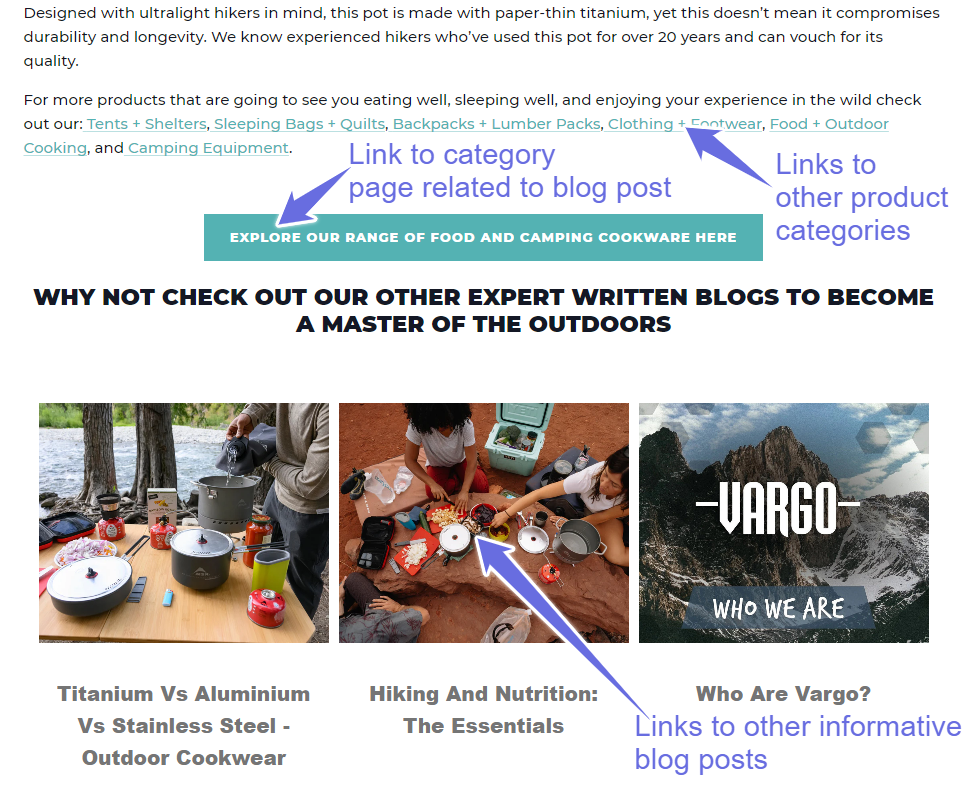
As you see, the blog post ends with a number of next steps the reader can take. The reader has the option to either head to a product category that sells the items talked about in the blog post, view other related product category pages, or continue to gather information with links to other blog posts.
So now we’ve checked out a great example in action, let’s take a look at our eComOne top 5 tips to help you smash your website’s internal linking;
- Make sure EVERY blog post has a call to action at the end! Whether it’s to a product page, category page, or another related blog post.
- Make sure you are using keyword rich anchor text!! DO NOT link from the word ‘here’ and try not to link from a raw URL (e.g. to find out more go to https://www.ecomone.com/blog).
- Once links have been implemented, keep on top of them!! DO NOT let links end up going to broken pages or pages that are now outdated and inaccurate.
- Less is more! Don’t fill blog/informational posts with dozens of different links. By doing this, firstly you’re going to completely dilute any page rank your links pass, and secondly, it will cause your more valuable links to end up getting lost in the sea of other links.
- Be sure to link from product or product category pages to relevant blog posts. If you’ve got a product category for coffee travel mugs, and a blog post about ‘the best travel mugs for keeping your coffee hot, then link to it, the information in that post could be the difference between someone buying or not buying.
- Make sure you don’t have orphaned pages that can’t be found through the on-site navigation – Orphaned pages are pages on a website that cannot be directly accessed through the website’s navigation structure, so by default, the only way to access them is either through the url, using an internal website search system, or through Google search results.
If you have a bigger website with hundreds or even thousands of pages, it is essential to make sure that all of your pages can be reached through your website’s navigation. Pages that can’t be accessed through the navigation become incredibly hard (if not impossible) for visitors to find. They also become incredibly hard to rank as it’s very difficult for them to build any authority due to the page having no internal links from other higher authority pages.
This unfortunately also reduces the flow of page rank to the orphaned page, reducing the likelihood that the page will meet Google’s expertise, authority and trustworthy criteria, essentially making it near impossible for the page to rank well in search results.
So how can you avoid ending up with orphaned pages on your website?
- Make sure your on-site navigation is properly planned out before building your website. This will help to make sure your navigation is designed to be able to include all pages, categories and subcategories ensuring that no pages or products end up orphaned and undiscoverable. Plus it will help you make sure your website is easy to navigate for visitors.
- Use crawl tools such as screaming frog or semrush to find any pages on your website that do not have any internal links going into them, then plan out where these can be added to the navigation or internal linking structure.
- Make sure you are maximising your internal linking strategy, this way even if pages are missed in the main navigation, they will still be accessible through other pages. Although this isn’t an ideal solution, it will provide a short term solution to make sure the page is able to be discovered until it is added to the main navigation.
7. Make sure any necessary page redirects are handled correctly – It’s almost inevitable that at some point you will have pages on your website that need to be redirected. This could be due to a url change, needing to temporarily divert traffic from a particular page, wanting to consolidate multiple pieces of similar content without losing the authority each has built up, or even due to carrying out a full website migration.
When thinking about carrying out a redirect, there are 2 main redirects most websites will use, these are;
- The 301 redirect – This is a permanent redirect meaning there are no plans for this redirect to be removed or the original page to be re-published.
- The 302 redirect – This is a temporary redirect, allowing a website to temporarily direct traffic away from a certain page. This could be whilst a page is updated or fixed, but eventually the original page will be re-published.
It is important to make sure that you use the correct redirect as using the wrong one could cause crawling or indexing issues. For example, using a 301 for a temporary redirect could result in the page becoming noindexed as Google sees it has been permanently redirected and concludes that it no longer needs to be indexed. On the other hand, using a 302 for a permanent redirect will mean that the page rank of the original page will not be passed on to the new page, meaning any authority and ranking power the original page has built will be lost.
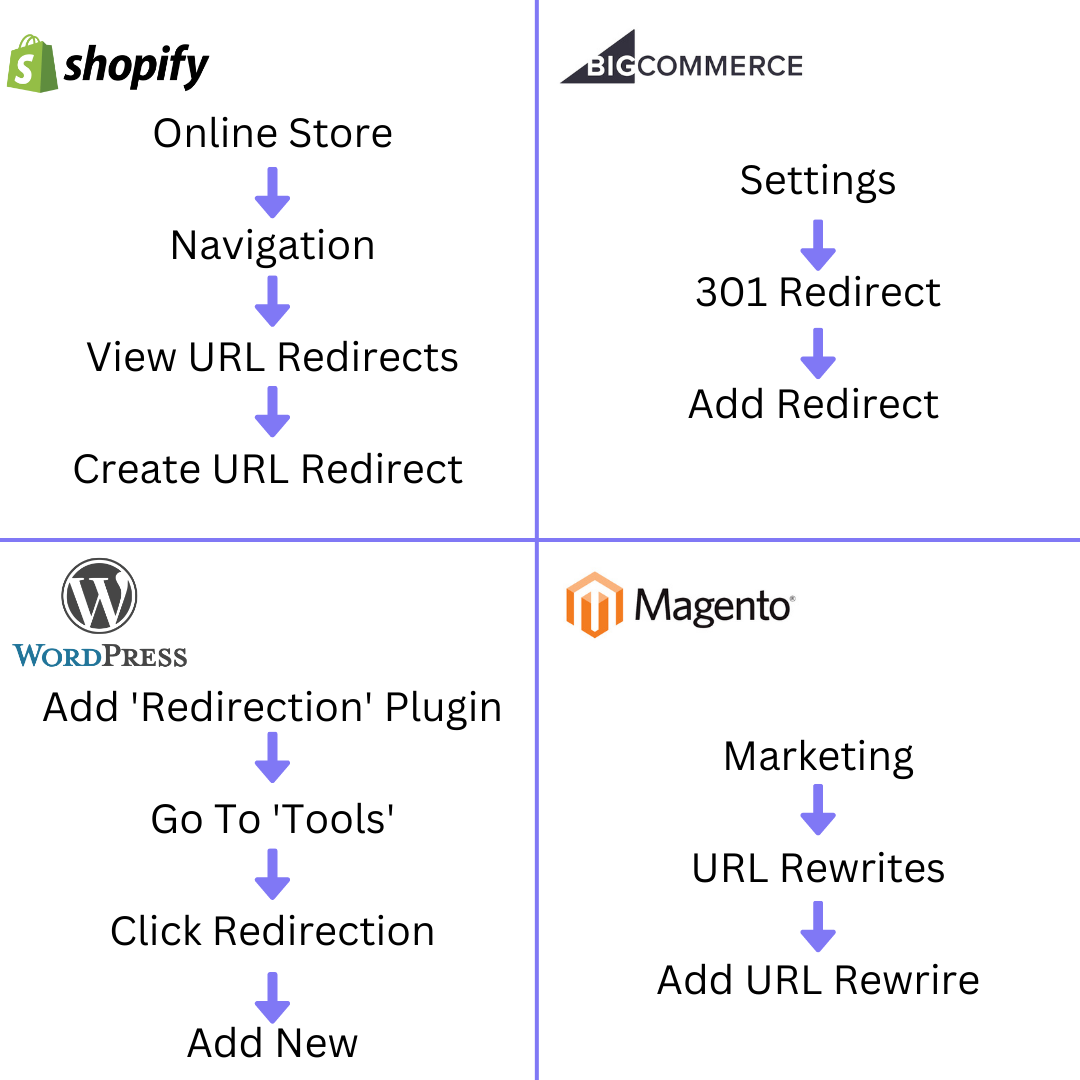
There are various ways that redirects can be implemented depending on the number of redirects you need to carry out. For a small number of redirects you can often use redirect functions that are built into website platforms (see image below for different platforms), or install a plugin such as ‘Redirection’ on WordPress.
However, there may also be times when you need to carry out redirects on a larger scale. This could be due to a site-wide migration or a change in the website architecture meaning hundreds or even thousands of url’s could need redirecting. In cases like this, redirects would be better handled in the website’s .htaccess file as this would allow for multiple url’s to be redirected at server level with a single instruction.
So to sum up, a few things worth considering when carrying out redirects are;
- Make sure you choose the right redirect for your situation, choosing the wrong one could have negative consequences on your website’s SEO.
- Make sure redirects take your visitors to the most suitable and relevant page possible. It is essential to minimise the inconvenience any redirects cause. For example, if your website no longer stocks a certain model of men’s trainer, don’t redirect to a women’s version of that trainer, or to the home page, as this is going to be no help to someone who is looking for men’s trainers. This is also essential for making sure page rank is passed to the new page location.
- It is important to keep track of redirects so your website does not end up with redirect chains or loops. This happens when multiple redirected pages end up in a chain causing your website to have to perform multiple redirects to produce a page, this can cause page speed issues which can in turn affect search engine ranking. It is also important to make sure redirect loops do not occur! This happens when a redirected page redirects to a page that redirects back to the original redirecting page, meaning your website will just continue to redirect with no page being delivered.
Tools such as the Semrush site audit can pick up on redirect chain or loop issues, failing that, websites such as redirectdetective or wheregoes are a great way to investigate individual pages for any redirect issues.
8. Make sure your website tracking is set up with Google Analytics 4 – One of the most powerful insights you have is the ability to see exactly how people are interacting with your website. With this information you can better understand what your best performing pages are, how long people are spending on your pages, what products are getting the most conversions, how people are moving through your website, and even where people are entering your website from.
With the new dawn of Google Analytics 4, it is essential to ensure that your website has a GA4 account that is tracking your website data. Although GA4 by default will track various metrics once your account has been set up and GA4 tracking has been configured, there is also the option to set up custom events and conversions to gather more insightful data for your business.
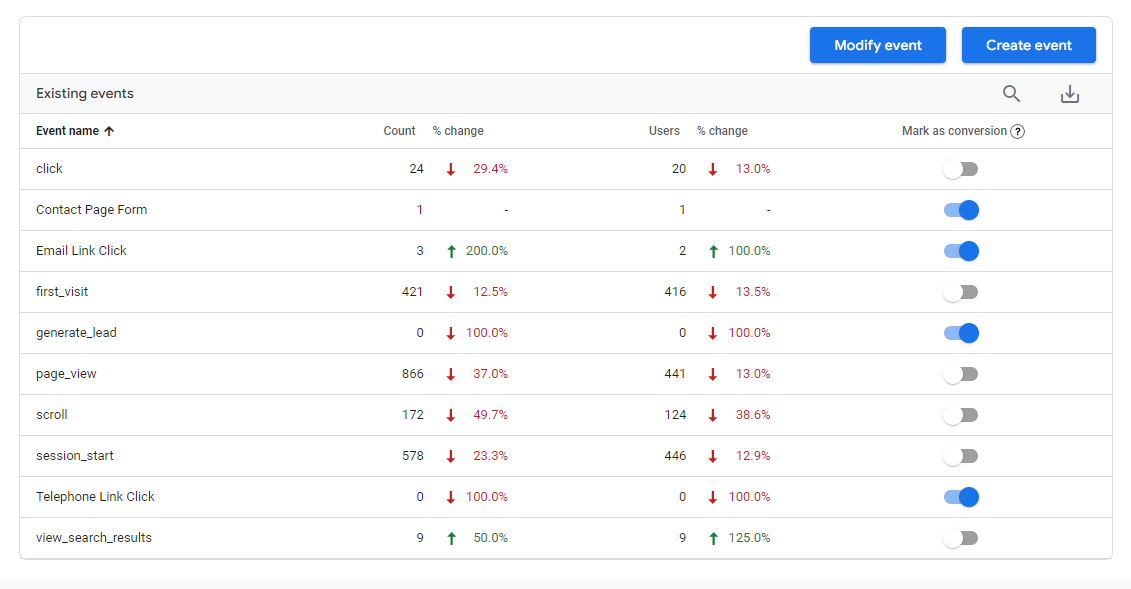
(An example of some of the events that can be tracked in GA4)
In order to set up your events you can use Google Analytics itself or Google Tag Manager. If you are using Google Tag Manager (find out how to set up Google Tag Manager here) you will also have to set up triggers to ensure events are sent when the corresponding action is taken on your site, and variables if you want to pass additional info to GA4. If you are unsure as to what other events your website should be tracking, Google provides a list of recommended events that already exist within GA4, so they will just need to be configured within Google Tag Manager to start tracking properly. Some of these events include;
- purchase – This will allow product purchases to be tracked in your GA4 account. When set up alongside custom parameters with custom dimensions and metrics, this event will also track the item/s purchased, how many have been purchased, the price of the items etc. This is essential for any business looking to monitor their most popular products as well as getting a better idea of product seasonality.
- add_to_cart – This allows GA4 to track users who have added products to their cart. When combined with events such as ‘begin_checkout’ this can provide great insight into issues that may be negatively impacting people’s buying journey, or improvements that need to be made to encourage more people to continue with their purchases.
- begin_checkout – This event allows Google to track users who begin the checkout process. Again, this information on its own is useful, but when combined with other events such as ‘add_payment_info’, ‘add_shipping_info’ and ‘purchase’, this can provide so much insight as to how effective your checkout process is and where people are dropping off during it.
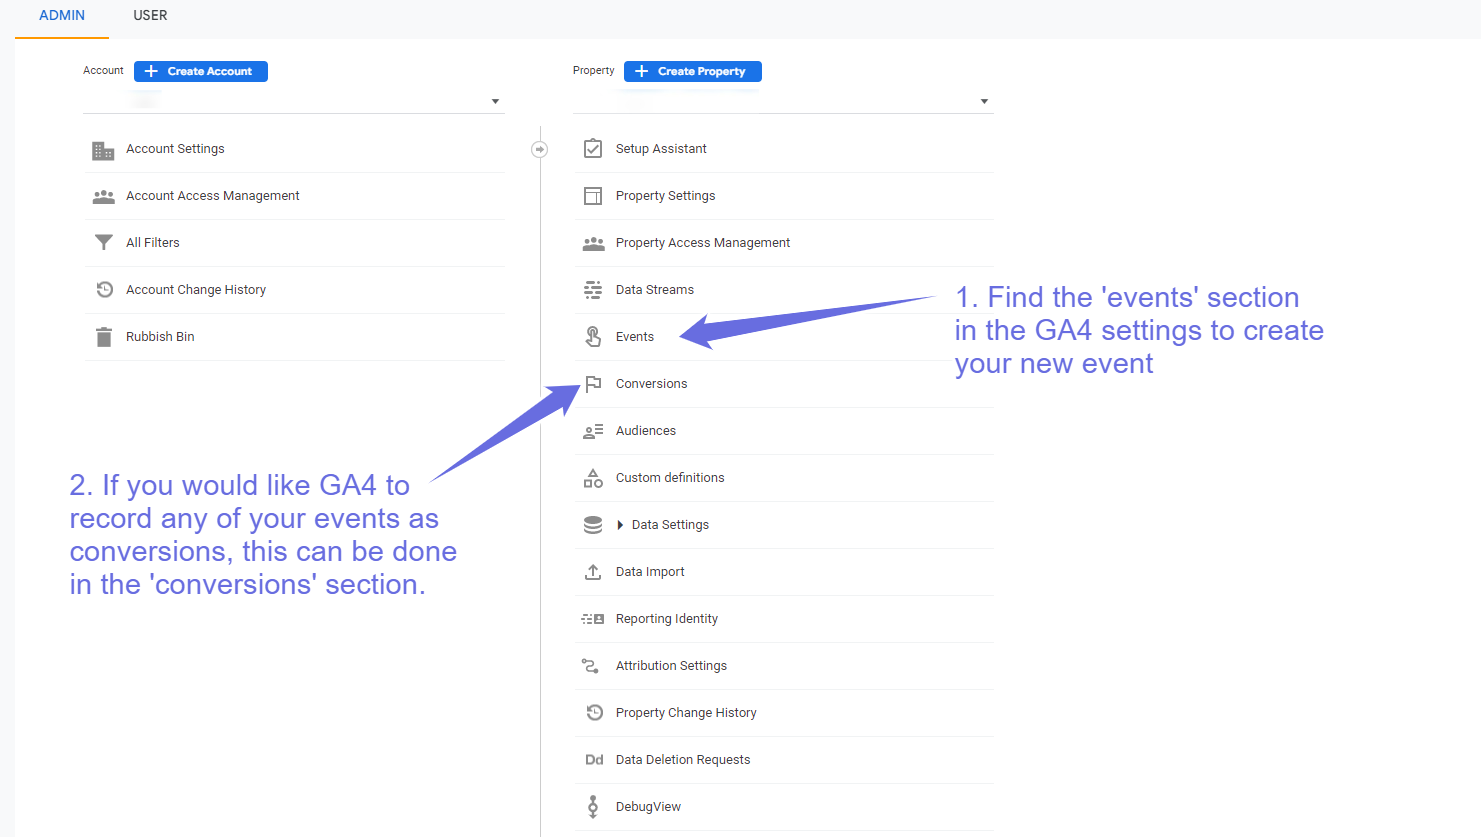
- generate_lead – The ‘generate_lead’ event allows websites to track things like form fills, appointment bookings or referrals. This is great for businesses that are more services based so require people to enquire about prices, or about different services offered. If one of your website’s key aims is to generate form fills and enquiries, this can also be marked as a conversion within the GA4 settings (see image below).
If you don’t already have a GA4 account, then head over to the Google Analytics home page to get your account set up, alternatively, you can find out how to switch your UA account across to GA4 in our GA4 Vs Universal Analytics blog. Once your account is set up, why not contact our technical team for help on tailoring your GA4 account to your store’s needs.
9. Make sure your website is utilising structured data to stand out in search results and increase CTR – Have you ever searched for a product on Google and noticed that some search results contain extra information? This could be a star review rating, price, availability status, an image of the product, or an FAQ section (see example below).
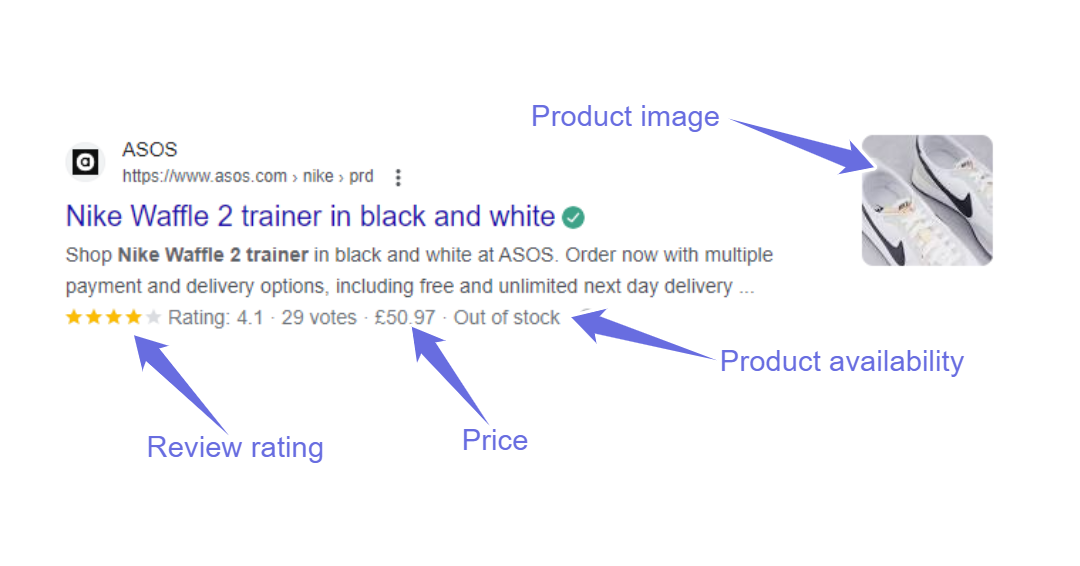
The reason behind this is structured data, also commonly known as schema markup. This is a HTML markup language used to help Google better understand the contents of your website and your individual pages.
Google currently understands a wide range of different schema types, a few of which include; local business markup, review markup, product markup, article markup and video markup, with the most common markup language recommended by Google being JSON-LD.
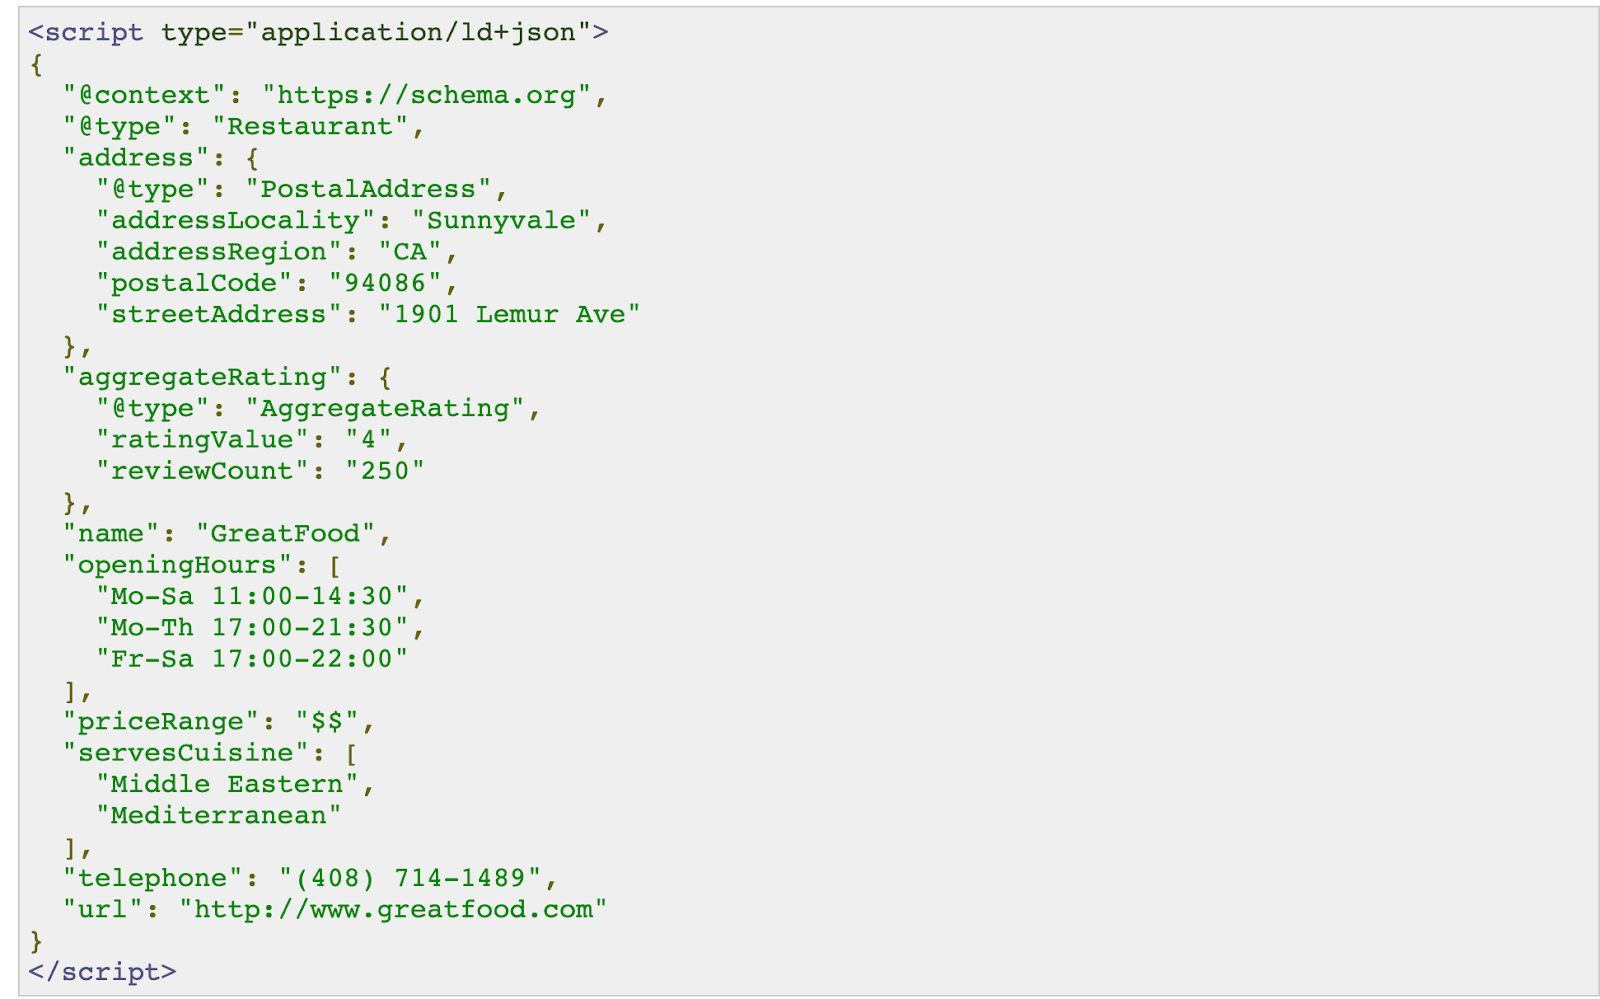
(AggregateRating Schema example from Schema.org)
But why should you make sure your website is using structured data? Well, structured data provides an incredible opportunity to make your search result listings stand out from the rest by providing a greater amount of information. It is also a great opportunity to take up more space in the search results. But the best part is that schema presents a great opportunity to increase your website’s click-through rates, increasing website traffic and conversions.
Although some websites may come with schema markup right out of the box, others may require it to be manually added. This can be implemented with the use of plugins such as Schema Pro or Rank Math, or by using tools such as Rank Ranger or technicalseo.com to create your own schema, which you can then manually add to your website.
For those looking to pursue the latter option, it is also highly recommended to ensure your schema markup is correct before adding it to your website’s code. This can be done using schema validation tools such as;
Once schema has been added to your website, you can also use Google Search Console to check for any validation issues or errors within your website’s schema. To ensure schema is implemented correctly, it is advised to check out Google’s schema guidelines to make sure you do not trigger any manual actions that could negatively impact your website’s performance.
10. Page speed –
“Nearly 70% of consumers admit that page speed impacts their willingness to buy from an online retailer.”
(Unbounce, 2019)
So although you are most likely aware of page speed and what it is, did you know that it is considered a very important ranking factor by Google? In fact, since 2010 Google has been using page speed as a ranking factor on desktop, then in 2018 Google announced page speed would be a ranking factor on mobile too.
Now, this makes sense for obvious reasons, firstly page speed greatly affects user experience, people simply do not want to wait 5 minutes to see a page. Secondly, that negative user experience then affects Google’s willingness to recommend your website, as Google does not want to send people to a website that isn’t providing a good experience. Finally, slow websites actually make it harder for Google crawlers to do their job as the same things that are making your website slow for users, will also make it slow to crawl for Google, so page speed is definitely worth paying attention to.
So how can you check your page speed? Two of the most commonly used tools are GTmetrix and Google PageSpeed Insights (as seen below). Through these tools you can find a variety of speed-based metrics, including time to first byte, largest contentful paint, total blocking time and cumulative layout shift, as well as recommendations for how to improve your overall site speed.

(Example of a Google PageSpeed Insights report)
So how can you make sure your website’s page speeds will keep you in Google’s good books? Below are 5 great ways to help you optimise your page load speeds;
- Hosting – Think about what kind of website hosting you buy as this is one of those “you get what you pay for” moments. Cheaper hosting usually means shared hosting, this can mean a lot more stress on the server your website is hosted on which can significantly slow down load times. Alternatively, dedicated hosting although more expensive, can offer a lot more reliable page speeds.
- Content delivery networks (CDN’s) – Content delivery networks are essentially a series of servers designed to store data close to where your searchers live. This happens through the caching of data at these different servers, allowing files such as javascript, images, stylesheets and html pages to be returned back to people’s devices quicker.
- Lazy loading – Lazy loading works by only loading the resources that will appear on the screen when a page first loads. So for example, when I load the eComOne homepage (see image below) this is all I see at first, so lazy loading would prioritise loading this content, then it would load the rest of the content as I begin to scroll down the page. This way you ensure that the section of content that your visitor will see when they enter your page is able to load as quickly as possible.
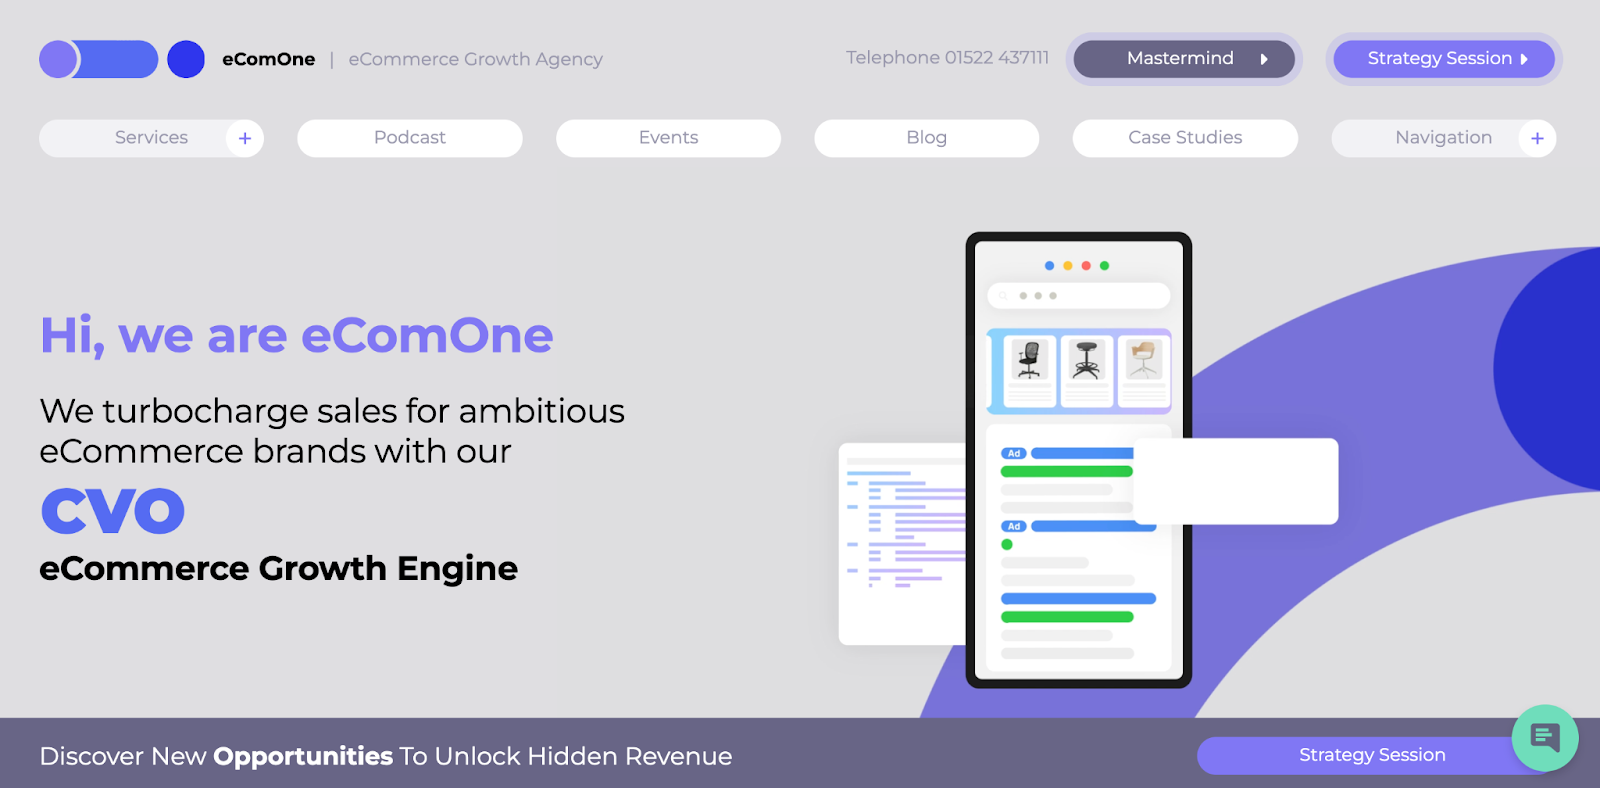
(eComOne homepage view when opened on desktop)
- Limiting integrations such as plugins – Although there are many integrations your website will need to work properly such as Google Analytics or Google Tag Manager, it is also important to remember that every integration you add to your website adds to the weight of your website.
This is particularly important for platforms such as WordPress where there are many plugin options offering a huge amount of extra functionality. The reason plugins and integrations can cause your website speed to slow down is due to the fact that they each add more code to your website which in turn creates more code that Google needs to read and load.
A good way to deal with this is to monitor which plugins or integrations your website is and isn’t currently using. So if you have plugins that your website no longer uses, make sure these are deactivated or even removed from your website. It is also worth doing your research to make sure you are using integrations that don’t add unnecessary weight to your website. So try to avoid plugins that offer dozens of different functionalities if you only need one particular function adding to your website, this can help you avoid adding lots of unnecessary extra code to your website for functions you won’t be using.
If you’re interested in learning about a few of our favourite tools for maximising website SEO potential, why not check out our article about the best tools for technical seo in 2023.
- Media optimization –


Would you believe me if I told you that these 2 images are not the same? Well…not the same in file size at least. The image on the left is uncompressed, delivering a file size of 535.6 KB, the image on the right is compressed, delivering a file size of 291 KB. That’s a 244.6 KB file size difference, and all it cost was 30 seconds to pop the image through an image compression tool.
So now let’s imagine your website has 100 images on it, and the average compression reduction per image is 180 KB…that’s 18,000 KB of file size your website has just lightened itself up by, which means a whole lot less data that your server has to transfer when somebody loads up your website. Not only does this save a lot of server space, but it also helps to boost your page load speed for a better user experience.
Again, this can either be done manually by running your images through a compression tool online, or through a website integration which allows you to automatically compress images as they are added to your website.
11. Website Design and Architecture – Website architecture simply refers to how your website is laid out, so how pages are organised throughout your website, and how pages are accessible through your navigation. This is something that should always be planned out in advance before you even begin to build your website. The better organised you are with this, the less likely you (or your visitors are) to run into issues such as page depth or page discoverability.
To get a rough idea of what a website’s architecture may look like, let’s look at a spider diagram produced using a Screaming Frog website crawl.
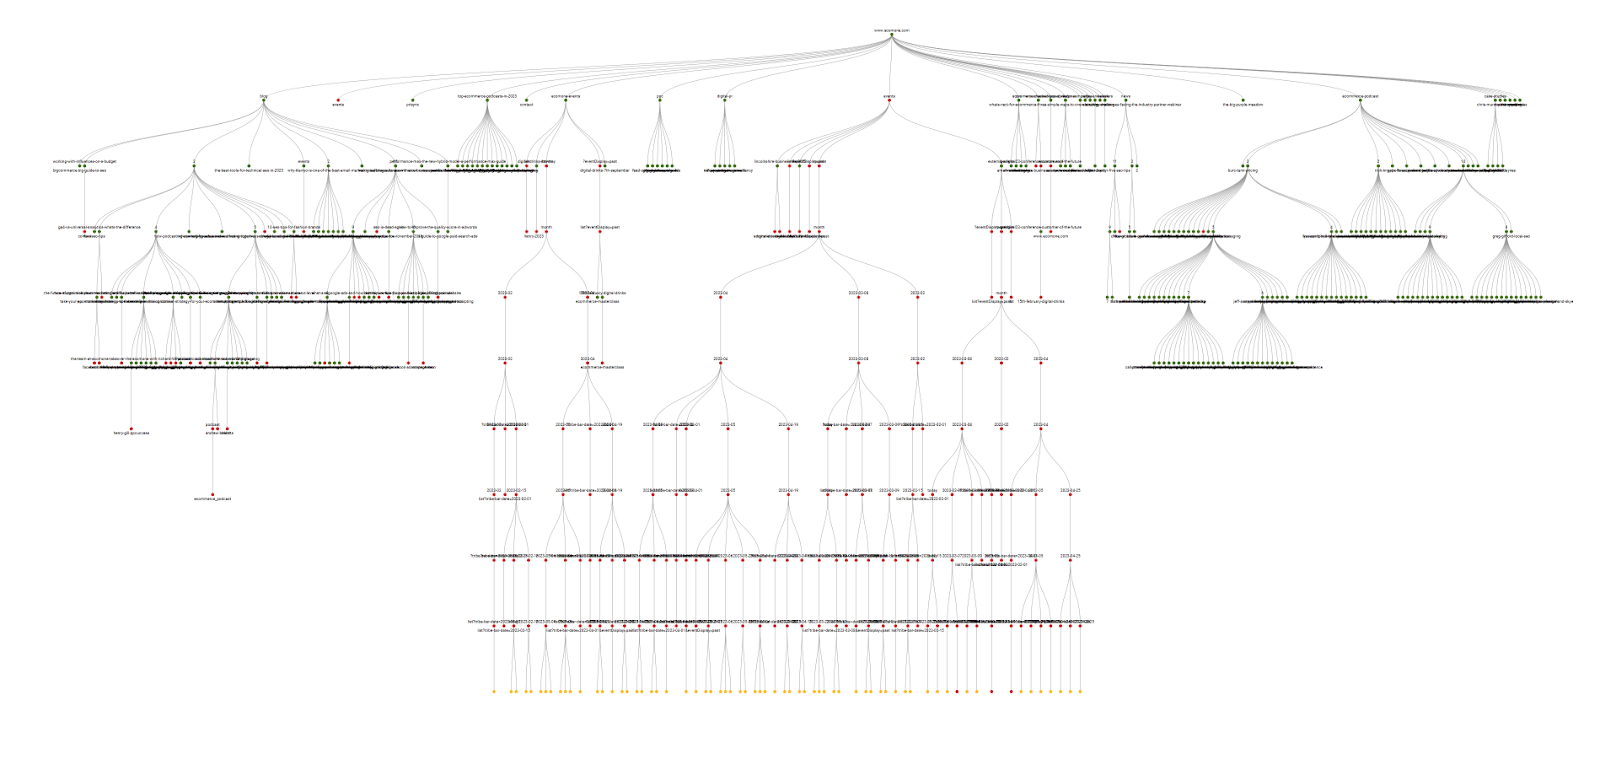
Although this is a very wide view, it provides a clear example of the structure of the website, showing the different pages and categories and how they all link together. Starting from the homepage at the very top, we see the main categories and pages the homepage links to, then the next pages and sub-categories those pages link to. This also allows us to get a clear view of how far away from the homepage certain pages are or even if we have any orphaned pages.
The key aim here should be to make sure that your website is laid out in a way that allows your website’s pages to be quickly and easily found. So how will your pages be broken down into categories and sub-categories, which categories and pages will go in the header menu and which will go in the footer menu, how will you use internal linking to connect relevant pages together. This is also where you will plan out where different content will go within your website, so if you’ve got product pages, articles about different products, articles about your industry, customer reviews, pages with information about your business/website, user generated content ect, where is all of this going to sit within your website structure.
Of course the complexity of this task will depend on the size of your website, for smaller websites with fewer pages it will be pretty simple to ensure all pages can be found easily. However, for bigger, more enterprise-level websites with thousands or even tens of thousands of pages and products, this will require a lot more planning and strategy.
So what should you think about when planning the architecture of your website?
- What categories and subcategories can you create to most efficiently catalogue your products and pages. This will make it a lot easier for people to use your on-site navigation to find the pages they are looking for.
- What products are your biggest sellers or bring in the most revenue? These are the products that need to be a top priority in terms of discoverability, these pages absolutely do not want to be buried underneath lower performing pages.
- How many clicks will it take a website visitor to reach each page? It is recommended that it should never take a visitor more than 3 clicks to reach any page. This is why optimising internal linking and planning out categories and subcategories in advance is so important, so navigational menus can be as effective as possible.
- How big is your website? Will your website be easy enough to navigate by using the menu navigation? Or would it provide a better user experience if your website had an internal search bar?
- Is your website design mobile friendly? Although your website may be responsive on mobile, does it still provide a good user experience? Is your menu still easy to find and use? Are all links still displayed on your pages or does the responsive design cause certain parts of your navigation or page to not display properly? One particular example here is product category page descriptions. Although long product category page descriptions may be fine on desktop, do they cause your products to end up getting pushed way down the page on mobile, meaning no products can be seen when a person first enters your category page.
So there you have it, 11 essential technical SEO considerations to make when designing or optimising your ecommerce website. If you would like more help to maximise your website’s performance through technical SEO, be sure to get in contact with our eComOne team to see how we can help you, or for more great advice, check out our fantastic selection of ecommerce blog articles.
